
Sunday, December 27, 2009
Thursday, December 10, 2009
MEL Script: "sb_ChannelBox_Operations_ADVANCED"
 1).
1). Main UI.
 4).
4).

"List" allows us to select which type of objects should be displayed in the List.
So v can work wid selected type of objects.

3).
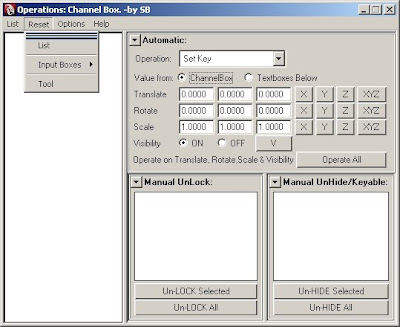
"Reset" provides options to reset the:
1. List = defaults to "Selected Objects" from the scene into this List.
2. Input Boxes = the Textboxes will reset to their defaults.
3. Tool = Reset complete UI to default setting.

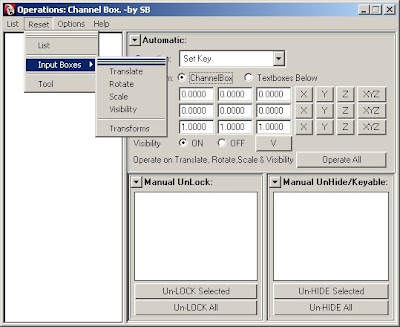
Here, its showing tat u can reset even selected Transforms like:
Translate &/or Rotate &/or Scale &/or Visibility &/or All Transforms
 4).
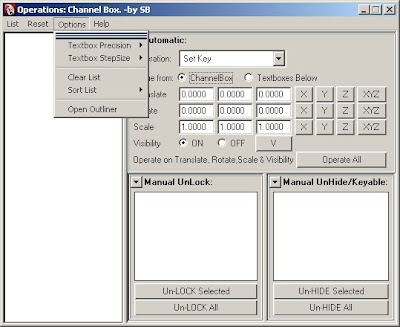
4). "Options" provide u:
1. Textbox Percision = U can change upto wat number of digits to the right of the decimal place u want.
2. Textbox Stepsize = Allows u to change the Increment/Decrement of the invisible slider which u use by: pressing Ctrl + press MMB & drag.
3. Clear List = U can clear/empty the List.
4. Sort List = U can sort the elements/objects in the List in either:
Ascending or Descending Order.
5. Open Outliner = If u want to select objects from the scene by urself using the Outliner, then by pressing this button, the Outliner pops-up.
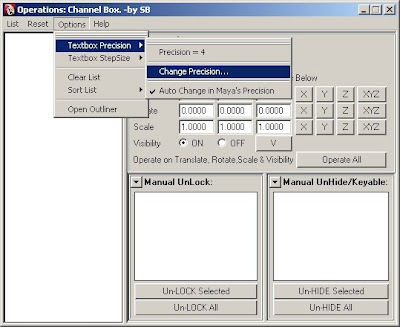

U can change the Precision from this window.


Note that:
If u disable "Auto change in Maya's Precision", then ur Precision wil b just for this script's Input Boxes and thus ur values wont get reflected properly in Maya coz Maya may hav a different Precision value.
So it is recommended to keep it On.

U can change the Stepsize from this window.
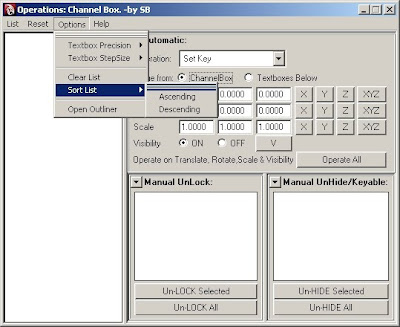

Objects present in the List can b sorted in either: Ascending or Descending order.
"Help" provides u:
1. Help... = Some info about functioning of this script.
2. About = Gives my email_id: sultanbal@gmail.com
Some info about this script like name, version number, etc..

6).
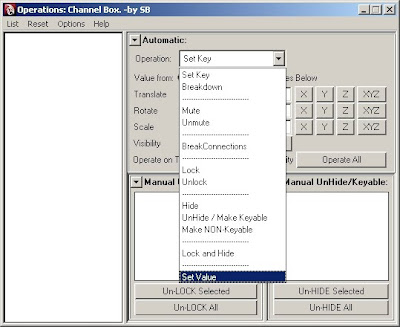
U can perform any of the given "Operation" choices to any of the Attribute of the selected objects from the List.
The "Operations" are :
1. Set Key
2. Breakdown
3. Mute
4. UnMute
5. BreakConnections
6. Lock
7. Unlock
8. Hide
9. Unhide / Make Keyable
10. Make NonKeyable
11. Lock and Hide
12. Set Value = U can even Set Values from this tool.
So u dont need to go to the Channel Box to change the values of the attributes of the selected objects.
Although u can Unlock & Unhide (or make Keyable) attributes from the "Operation" drop-down by selecting the objects from the List.
But,
"Manual UnLock" = Lists all locked attributes with their object names.
"Manual Unhide" = Normally, u cannot c which attributes r hidden.
U hav to individually select each object & then u figure out their
hidden attributes.
"Manual Unhide" shows u the all attributes tat r hidden
& tat too for all selected objects from the List.
U can even "Un-Lock Selected" &/or "UnLock All".
Similarlry, "UnHide Selected" &/or "UnHide All".
The objects in the List has some RightMouseButton (RMB) functionailties like:
1. Select in Scene = Selects highlighted objects in the list.
2. Clear Selection from Scene = U can de-select already selected objects from the scene.
3. Remove Selected = Removes highlighted objects only from the List.
4. Remove Non-Selected = Its the reverse of "Remove Selected".
5. Invert Selection = Inverts ur selection in the List.
6. Invert Selection & Remove Non-Selected = Combination of "Invert Selection" and "Remove Non-Selected".
Thursday, December 3, 2009
Thursday, November 26, 2009
Wednesday, November 25, 2009
MEL Script: "sb_ChannelBox_Operations"

Features:
U can hav all the same features as u wud get by RMB on the Channel box by selecting single or multiple objects from the scene. But by using this script, it'l b faster & convenient for u :)
Here, "Operate_All" button wil perform the selective operation on all Translate(X,Y,Z), Rotate(X,Y,Z), Scale(X,Y,Z) and on Visibility.

MEL Script: sb_Rename
Tool for Animators
Name of Tool: "Convert 1's to Two's (Doubles) (or even 3's, 4's, 5's) "

Function:
This tool creates same image for 2 frames.
Thus there wil b 12 drawings for a 24 fps shot.
If animation is on 3's then it'l require 8 drawings for 1 sec shot.
If on 4's then 6 drawings for 1 sec shot & so on.
Animators uses a blend of 1's, 2's, 3's, 4's for variety of shots.
Demo Example:
Step#1: Start the Tool.
Step#2: Load Image Sequence say from foll location:


U only need to select the First File from the Image Sequence, the other images get loaded automatically by this tool.
It also shows information like:
1). Path of image sequence.
2). File numbers.
3). Total number of files.
4). File Type
Step #3: Select the Destination folder:

U can select any folder or can even create a from within this tool itself :)
Step #4: Click on OptionButton as u want it to b exported as. Say for 2's animation, click on 2's:
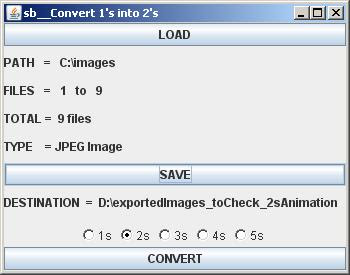
Step #5: Click the 'CONVERT' button & get the result instantly :)

Result #1: If u selected "2s", then:

Result #2: If u selected "3s", then:

Result #3: If u selected "4s", then:

Result #4: If u selected "5s", then:

Monday, September 14, 2009
"Create Cameras at Perspective Viewport"

Features:
1. U can create a NEW Camera at ur Current PerspectiveView.
By this, u wont hav to Lock ur PerspCamera which normally many of us do ;)
2. U can LOCK Trasnforms of this New Camera.
3. U can also add this new Camera into a :
(i). New Layer
-It has options:
a). Change DisplayType to Normal/Reference/Template.
b). Toggle Visibility of this new layer.
(ii). Existing Layer
U can select any of the existing layers from the scene by using the drop-down
Friday, April 3, 2009
"Change Local Rotation Axes"
"Create Joint Controllers"

Features:
1. Creates Circle Controller & Aligns itself to joint
2. Controller Matches the Orientation of joint
3. Controller Matches the Rotate Order of joint
4. Controller is Freeze Transformed & joint retains its rotation values
5. Circle Controller is Orient Constrained to respective joint
6. An extra Null group is provided to use for SDK (Set Driven Key) as seen from the Outliner
Subscribe to:
Comments (Atom)


